Archive

Tag Archives: easter

Happy Easter!

Happy Easter!


The first days of spring always feel so tentative and so restrained: watery sunshine, pale buds. I wondered what I liked so much about this insipid season last year. And then spring burst out in its full extravagance. Suddenly there are almost endless hours of day-light (none of that hopeless saving of time). Everywhere you look there are vibrant greens bursting into life.

And then out of the blue there is Easter (was it not only just Christmas?)

As a kid Easter was spent hunting for eggs at my grandmother’s.  Usually we first coloured them with those brightartificialdyes that came in tablet form, but I will never forget the year that my uncle arrived with all these littlesachet of natural dyes….including dried red insects. (The seed for my fascination for unusual ingredients was planted at a young age 🙂 )

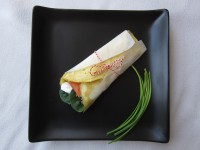
Besides painting eggs we do not really have any family Easter traditions…Except for eating together of course. This means that I am free to experiment with other people’s foody traditions 🙂  One wonderful discovery has been this beautiful braided sweet bread circled around a dyed egg.

The tradition of eating sweetened bread for Easter may date back as far as the Homeric Greek period (ca. 1100–800 BC). The eggs echo the significance of Easter as they are traditionally connected with rebirth, rejuvenation and immortality. Or, viewed from a more practical perspective: eggs were forbidden during Lent, after 40 days there would have been plenty of eggs that had to be used up.

This bread tastes wonderfully sweet and light; it looks stunning on any Easter brunch table.

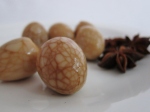
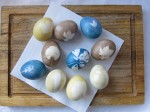
NB: Nowadays I tend to opt for slightly less exotic ingredients for dying eggs. For some ideas pop over to my post on dying eggs with natural ingredients.

Wishing you a Happy Easter!


223 IMG_1568


Ingredients
(from the blog ‘Italian Dish‘)
4 breads


230ml (1,25 cups) milk
80g (1/3 cup) butter
1 package of instant yeast (about 3 tsp)
pinch of salt
80g (1/2 cup) sugar
2 eggs
350-500g (3,5 cups) flour
1 egg
6 dyed eggs (they can be dyed raw as they will bake in the oven)


Recipe

  1. In a small saucepan, warm the milk and butter until the butter just melts. Do not let the milk get too hot (or allow it too cool before adding it to the yeast).
  2. In a large bowl combine yeast, salt and sugar.
  3. Add the eggs and mix.
  4. Add the warm (not hot!) milk and butter mix.
  5. Add about half the flour and combine using the dough hooks of your mixer. Mix until smooth.
  6. Slowly add the remaining flour to form stiff dough. (The amount of flour needed will vary. You are looking for dough that is not sticky any more.)
  7. Knead the dough (either by hand or in a stand mixer) until the dough is pliable and soft.
  8. Lightly oil a bowl. Place the dough inside. Cover with cling film and allow to rise in a warm place until doubled – for about one hour.
  9. Prepare two baking trays by lining them with parchment paper.
  10. Punch down the dough. Divide into 12 pieces. Roll each piece into a rope (about 2.5cm / 1 inch thick and about 35cm/ 14 inch long).
  11. Taking three pieces at a time, braid them together. Loop into a circle, tucking the ends inside.
  12. Cover with cling film and allow to rise in a warm place until double – for about 30 minutes.
  13. Heat the oven to 175C (350F).
  14. Beat the remaining egg and brush over the bread.
  15. Place a dyed egg in the center of each bread, pushing it down slightly.
  16. Bake about 20 min until ht bread is golden brown.
  17. Allow to cool on a rack.
  18. Note: If you leave the bread out for a few hours you should no longer eat the eggs.

More Easter and egg recipes

222 001 (5)

I have mentioned before, that I started blogging because I wanted to keep a record of what I cook (just for myself) and wanted to find a way of sharing my recipe with friends and family (without bombarding them with endless emails). Little did I know that blogging would introduce me to a whole new world of blogging friends that share my passion for food. I have met so many lovely new people, like Vanya who I have really been enjoying to get to know through her stories,  recipes and the comments she leave on my posts.

And then one day Vanya took me by surprise by invting me for a visit – blogger style. A few weeks back she hosted me as a guest on her blog and I brought some Beet Muffins to celebrate the occasion. Of course I immidiately wanted to return the honour, by inviting her to do a guest post on my blog. She had a few suggestions for recipes of which one immidiately caught my eye: Arabian Fried Eggs. I was mystified and curious. But let me make way for Vanya to explain this magnificent recipe further:

222 001 (1)222 004


Fried hard boiled eggs are a common feature in many Middle Eastern households but you will find this most commonly in Egypt. I first came across this recipe in the Middle Eastern cookbook, Traditional Arabic Cooking by Miriam Al Hashimi. According to the author, if you take a walk through the markets of Cairo, you can find traders selling tiny packets or conesof blended spices which are used for flavouring the fried eggs.

There are several different variations based on the blend of spices. The one I decided to try was the sumac-sesame seed blend.

Sumac is a flowering shrub and the dried fruit drupes of this plant is ground to get a crimson red tangy spice that is used extensively in Middle Eastern cooking. This spice has a tangy, lemony, citrusy flavour that goes well in salad dressings and with grilled meats. Sumac is easily available these days at most supermarkets or in specialty Middle Eastern food stores.

This dish makes a delicious and pretty accompaniment or starter to any meal. So here’s the recipe for Baid Mutajjan or fried hard boiled eggs rolled in sumac-sesame seed spice blend.

222 001 (3)

Ingredients

5 fresh eggs
2-3 tbsp vegetable oil
3 tbsp sumac
2 tbsp sesame seeds
salt – to season
fresh coriander leaves – finely chopped, for garnish


Recipe

  1. Hard boil the eggs, remove shell and cut into halves. Season lightly with salt.
  2. Dry roast the sesame seeds till light golden; make sure not to burn.
  3. Coarsely grind the sumac and sesame seeds in a mortar and pestle and keep aside.
  4. In a flat pan, heat oil (on medium heat) and place the eggs yolk side down. A bit of splutter is expected. (You can fry the eggs whole too without cutting into halves but ensure that you prick a couple of holes with a fork to avoid the eggs from exploding.)
  5. After a minute or two, turn the eggs over and fry another minute. Remove from flame.
  6. Roll or dust the eggs with the sumac-sesame seed blend. Garnish with chopped coriander leaves just before serving.

 For more of Vanya’s amazing recipes visit her site Skinny Chef de Cuisine.


222 001 (4)

Tea and soy infused eggs

Tea and soy infused eggs


Although the snow outside makes it look more like Christmas, it is Easter again. To go with the non-traditional weather we are making some unconventional Easter eggs: Marbled Chinese Tea Eggs. They take little effort and look absolutely stunning.  You can use regular eggs or try quail eggs for an even cuter result.

These eggs are super tasty and not only for Easter. They make a great snack or little side dish for a dim sum style dinner; or add them to a salads and stir fries.


Ingredients
6 regular eggs (or 18 quail eggs)
6 tbsp light soya sauce
2 tbsp dark sweet soya sauce
1 tbsp salt
1 tbsp sugar
3 pieces of whole star anise
8 black peppercorns, left whole
1 long cinnamon stick
1 tea bag or 2 tbsp loose black tea leaves

Recipe

  1. Place the eggs in a large saucepan or pot, and cover with cold water.  Bring to a boil, and then remove from heat and let stand for 10 minutes. (Place quail eggs in boiling water for 4 minutes)
  2. Use a slotted spoon to place the eggs in an ice bath for a few minutes. Leaving the hot water in the pot.
  3. Once the eggs are cool enough to handle, tap and roll them to break the shells all over.
  4. Add the soy sauces, salt, sugar, star anise, cinnamon, pepper corns to the hot water.
  5. Hang the tea bag into the water (or sprinkle in the tea leaves.)
  6. Return the cracked eggs to the pot.
  7. Cover and bring to the boil. Cook at a low simmer for 2 hours. Ensure that the eggs are covered in liquid, adding water if necessary.
  8. Turn off the heat and allow to cool completely. Refrigerate the eggs in the liquid over night.

Tips & Variations

Consider some of the following

  • Chinese five spice powder
  • mandarin rind or juice


Other Easter egg recipes

103 IMG_8950

Delicate Devilled Eggs….either plain….

….or pretty in pink…

I love making Devilled Eggs for finger-food parties. Granted they are a little old fashioned. Or maybe I should say they are a classic – at every party they disappear within no time.

This recipe is a gorgeous looking twist on the usual plain eggs. The eggs are pickled in beet juice and turn a stunning pink.

If I am totally honest personally I prefer the delicate flavour of plain deviled eggs, but these eggs look so stunning I am sure I will make them again.


Ingredients
(Pickling recipe from blog ‘Go Lightly Gourmet
Devilled Egg recipe from “Komm Koch und Back mit mir” – my first cookbook ever)
6 eggs

Pickled eggs:

30ml (1/4 cup) of agave syrup (or 30g sugar)
125ml (½ cup) of apple cider vinegar
125ml (½ cup) of water
½ teaspoon of sea salt
½ teaspoon of whole cloves
½  teaspoon of whole allspice
1 cinnamon stick
3 medium beets
½ onion sliced into very thick slices
6 large farm fresh eggs, hard boiled, cooled and peeled

Devilled egg filling:

3 tbsp mayonnaise
1,5 tsp mustard
Salt, Pepper

Recipe

Pickled eggs:

  1. To make the pickling mixture, add all the ingredients except for beets, onion, eggs to a saucepan.
  2. Bring to a gentle boil. Reduce heat and simmer for 10 minutes, stirring occasionally. Remove from the heat.
  3. Wash the beets. Cut off the ends and cut into quarters. (Be carful not to touch the cut surfaces or use gloves.)
  4. Place in a pot and cover with water. Bring to the boil. Reduce heat and simmer for 10-15 minutes until beets are just tender.
  5. Pour off water and allow beets to cool slightly.
  6. Place hard-boiled eggs, onion, cooked beets in a large glass jar or a zip lock bag. Pour in the pickling mixture.
  7. Place in the fridge and pickle for a minimum of 24 hours and up to 2 weeks. The longer the eggs pickle the deeper the pink will seep into the egg. (The eggs on the photograph were pickled whole for 48 hours. I then cut them open and removed the egg yolk to make the deviled egg filling. I returned the egg white halves to the pickling mixture for another 24 hours.)

Devilled egg filling:

  1. Carefully cut the eggs open lengthwise. (I wipe my knife in between eggs as not to transfer egg yolk onto the white.)
  2. Use a teaspoon to remove the egg yolk.
  3. Use a tablespoon to push the egg yolks through a sieve.
  4. Add mayonnaise, mustard, salt and pepper to the yolks and combine. Adjust amounts to suite your taste.
  5. Spoon the mixture into a piping bag and decorate the eggs (alternatively you can use two teaspoons to place the filling into the eggs.)
  6. The eggs can be prepared earlier in the day and stored in the fridge. I have even made them the day before despite the fact that I always read that eggs, once boiled and peeled, should be refrigerated in water.

 
Serve with

Other pink foods for a baby shower: (recipes will follow over the next few days)

Pizza Rustica - Easter Pie with Smooth Ricotta and Italian Meats

Why only stick to the traditions you know? Holidays are a fabulous excuse to discover new ones. This Easter I  experimented with Pizza Rustica. A true family dish that seems to have endless variations. I combined bits of inspiration from about four different recipes. Therefore, you should consider the below recipe as no more than a guideline.  Especially the pastry seems to come in many different forms: from pizza dough to thin layers of flaky pastry.

As you serve this pie at room temperature it would also make for a great picnic dish.

Ingredients
Crust
280g (2 cups) flour
30g (¼ cup) sugar
¼ tsp salt
½ tsp baking powder
120g (1/2 cup) cold, unsalted butter, cut into cubes
2 large eggs

Filling
8 eggs
900g (2 lb) ricotta
220g (8 oz) mozzarella
80g (1 cup) parmesan and/or pecorino
100g  (3,5 oz) Salami (one or two different types)
80g (3 Oz) Prosciutto
1 bunch of flat-leaf parsley
1/4-1/2 tsp ground nutmeg
1 1/2 tsp ground black pepper
¼ tsp salt

Recipe
Crust

  1. Combine flour, sugar, salt and baking powder in a food processor and pulse to mix.
  2. Cut the butter into cubes and evenly distribute over the flour.
  3. Pulse again until mixture resembles fine breadcrumbs.
  4. Add the eggs and continue to pulse until dough forms a ball.
  5. Remove dough and divide into two pieces – one of them a little larger than the other. Shape two disc and separately wrap in cling film.
  6. Chill for at least half an hour (or up to over night).

Filling

  1. Into a large bowl, break 3 eggs and beat thoroughly.
  2. Add the ricotta and stir to incorporate thoroughly.
  3. Cube the mozzarella. Grate the parmesan. Cube the meat. Chop parsley.
  4. Add all the ingredients to the ricotta.
  5. Season with salt, pepper and nutmeg. Stir again to incorporate.
  6. Refrigerate the filling until you are ready to assemble the pie (you can prepare the filling the day before).

Assemble 

  1. When you are ready to make the pie. Heat the oven 190C (375F).
  2. Prepare a round cake tin by lining the base with baking paper.
  3. Roll out the larger disc of dough first. Place in the cake tin. Allow the edges to hang over the side.
  4. Spoon in filling and smooth the surface. Using a table spoon make four evenly spaced indentations.
  5. Break the eggs into the indentations.
  6. Fold the overlapping edges towards the center.
  7. Roll out the second disc. Cut the pastry the size of the cake tin and use it to cover the pie. Press the edges together (you can use a fork).
  8. Cut the leftover pastry into leaves and decorate the pie.
  9. Cut a cross into the center of the pie as a vent.
  10. Lightly beat the last egg and brush onto the pie.
  11. Place the pie in the oven and bake for 50-80 minutes. Check the pie after about 30 minutes. If it is browning too fast, cover loosely with aluminum foil.
  12. To check if the pie is done insert a knife into the air vent. It should come out clean.
  13. Once done, remove from the oven and allow to cool slightly. Remove the ring of the cake tin.
    Allow to cool to room temperature before serving.