Happy Easter!

Happy Easter!


The first days of spring always feel so tentative and so restrained: watery sunshine, pale buds. I wondered what I liked so much about this insipid season last year. And then spring burst out in its full extravagance. Suddenly there are almost endless hours of day-light (none of that hopeless saving of time). Everywhere you look there are vibrant greens bursting into life.

And then out of the blue there is Easter (was it not only just Christmas?)

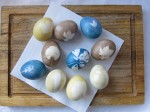
As a kid Easter was spent hunting for eggs at my grandmother’s.  Usually we first coloured them with those brightartificialdyes that came in tablet form, but I will never forget the year that my uncle arrived with all these littlesachet of natural dyes….including dried red insects. (The seed for my fascination for unusual ingredients was planted at a young age 🙂 )

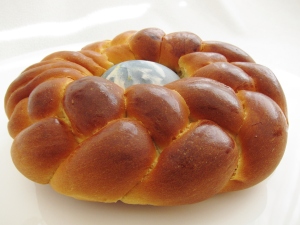
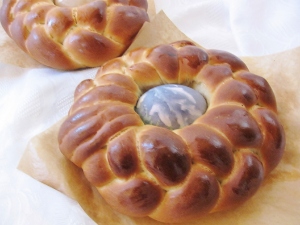
Besides painting eggs we do not really have any family Easter traditions…Except for eating together of course. This means that I am free to experiment with other people’s foody traditions 🙂  One wonderful discovery has been this beautiful braided sweet bread circled around a dyed egg.

The tradition of eating sweetened bread for Easter may date back as far as the Homeric Greek period (ca. 1100–800 BC). The eggs echo the significance of Easter as they are traditionally connected with rebirth, rejuvenation and immortality. Or, viewed from a more practical perspective: eggs were forbidden during Lent, after 40 days there would have been plenty of eggs that had to be used up.

This bread tastes wonderfully sweet and light; it looks stunning on any Easter brunch table.

NB: Nowadays I tend to opt for slightly less exotic ingredients for dying eggs. For some ideas pop over to my post on dying eggs with natural ingredients.

Wishing you a Happy Easter!


223 IMG_1568


Ingredients
(from the blog ‘Italian Dish‘)
4 breads


230ml (1,25 cups) milk
80g (1/3 cup) butter
1 package of instant yeast (about 3 tsp)
pinch of salt
80g (1/2 cup) sugar
2 eggs
350-500g (3,5 cups) flour
1 egg
6 dyed eggs (they can be dyed raw as they will bake in the oven)


Recipe

  1. In a small saucepan, warm the milk and butter until the butter just melts. Do not let the milk get too hot (or allow it too cool before adding it to the yeast).
  2. In a large bowl combine yeast, salt and sugar.
  3. Add the eggs and mix.
  4. Add the warm (not hot!) milk and butter mix.
  5. Add about half the flour and combine using the dough hooks of your mixer. Mix until smooth.
  6. Slowly add the remaining flour to form stiff dough. (The amount of flour needed will vary. You are looking for dough that is not sticky any more.)
  7. Knead the dough (either by hand or in a stand mixer) until the dough is pliable and soft.
  8. Lightly oil a bowl. Place the dough inside. Cover with cling film and allow to rise in a warm place until doubled – for about one hour.
  9. Prepare two baking trays by lining them with parchment paper.
  10. Punch down the dough. Divide into 12 pieces. Roll each piece into a rope (about 2.5cm / 1 inch thick and about 35cm/ 14 inch long).
  11. Taking three pieces at a time, braid them together. Loop into a circle, tucking the ends inside.
  12. Cover with cling film and allow to rise in a warm place until double – for about 30 minutes.
  13. Heat the oven to 175C (350F).
  14. Beat the remaining egg and brush over the bread.
  15. Place a dyed egg in the center of each bread, pushing it down slightly.
  16. Bake about 20 min until ht bread is golden brown.
  17. Allow to cool on a rack.
  18. Note: If you leave the bread out for a few hours you should no longer eat the eggs.

More Easter and egg recipes
222 001 (5)

I have mentioned before, that I started blogging because I wanted to keep a record of what I cook (just for myself) and wanted to find a way of sharing my recipe with friends and family (without bombarding them with endless emails). Little did I know that blogging would introduce me to a whole new world of blogging friends that share my passion for food. I have met so many lovely new people, like Vanya who I have really been enjoying to get to know through her stories,  recipes and the comments she leave on my posts.

And then one day Vanya took me by surprise by invting me for a visit – blogger style. A few weeks back she hosted me as a guest on her blog and I brought some Beet Muffins to celebrate the occasion. Of course I immidiately wanted to return the honour, by inviting her to do a guest post on my blog. She had a few suggestions for recipes of which one immidiately caught my eye: Arabian Fried Eggs. I was mystified and curious. But let me make way for Vanya to explain this magnificent recipe further:

222 001 (1)222 004


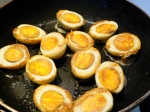
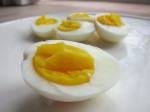
Fried hard boiled eggs are a common feature in many Middle Eastern households but you will find this most commonly in Egypt. I first came across this recipe in the Middle Eastern cookbook, Traditional Arabic Cooking by Miriam Al Hashimi. According to the author, if you take a walk through the markets of Cairo, you can find traders selling tiny packets or conesof blended spices which are used for flavouring the fried eggs.

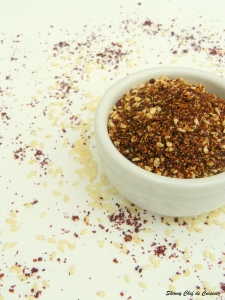
There are several different variations based on the blend of spices. The one I decided to try was the sumac-sesame seed blend.

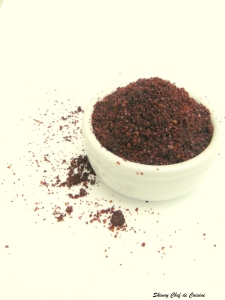
Sumac is a flowering shrub and the dried fruit drupes of this plant is ground to get a crimson red tangy spice that is used extensively in Middle Eastern cooking. This spice has a tangy, lemony, citrusy flavour that goes well in salad dressings and with grilled meats. Sumac is easily available these days at most supermarkets or in specialty Middle Eastern food stores.

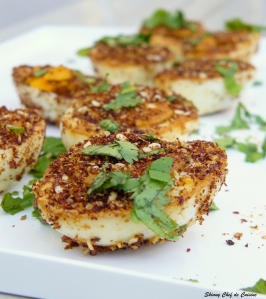
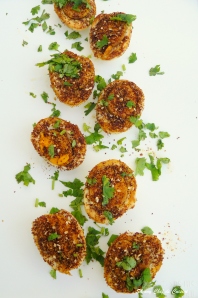
This dish makes a delicious and pretty accompaniment or starter to any meal. So here’s the recipe for Baid Mutajjan or fried hard boiled eggs rolled in sumac-sesame seed spice blend.

222 001 (3)

Ingredients

5 fresh eggs
2-3 tbsp vegetable oil
3 tbsp sumac
2 tbsp sesame seeds
salt – to season
fresh coriander leaves – finely chopped, for garnish


Recipe

  1. Hard boil the eggs, remove shell and cut into halves. Season lightly with salt.
  2. Dry roast the sesame seeds till light golden; make sure not to burn.
  3. Coarsely grind the sumac and sesame seeds in a mortar and pestle and keep aside.
  4. In a flat pan, heat oil (on medium heat) and place the eggs yolk side down. A bit of splutter is expected. (You can fry the eggs whole too without cutting into halves but ensure that you prick a couple of holes with a fork to avoid the eggs from exploding.)
  5. After a minute or two, turn the eggs over and fry another minute. Remove from flame.
  6. Roll or dust the eggs with the sumac-sesame seed blend. Garnish with chopped coriander leaves just before serving.

 For more of Vanya’s amazing recipes visit her site Skinny Chef de Cuisine.


222 001 (4)


Quick and easy, fragrant bread

Quick and easy, fragrant bread


The other week I got a mysterious souvenir gift: a little jar labelled “Charoset”. I had to go by the picture of dates on the front to guess at its content as all the other words on the jar were in Hebrew. This little mystifying jar had travelled half-war round the world. Not only that, it had to travel most of the way all on its own: It started its trip comfortably nestled in the safety of the suitcase my friend CL was carrying on her way back from Israel. At the airport however security was suspicious of this little vessel with its dark content. So this little jar was packed off all on its own for the long trip to Europe. How foreign that little parcel must have looked on the baggage belt amongst all those huge and well travelled suitcases.

This weekend I was holding this little jar in my hands, impatient to discover its content. But after it had travelled all this way I could hardly just dive in with a spoon for an unceremonious quick taster. Bread was needed! But I had none, not even a single slice was to be found in the freezer. And I certainly did not have the patience to bake a loaf. So I pulled out my favourite recipe for super-fast, emergency skillet bread.

This bread comes together in minutes. It takes no more than a quick stir to make the batter and then a few minutes in a skillet on a stove. The combination of buckwheat and quinoa give this skillet bread a strong nutty flavour.  It is a great side for a cheese plate but just as nice with a spoon full of jam – or as it turns out, charoset. When I make it to go with something sweet I often throw in a teaspoon of nigella seeds to enhance the fragrant flavour of the bread. But this time I left it plain as I wanted the charoset to take the star role.

But I had no need to worry, the charoset was one powerful combination of flavours: deeply sweet with a hint of earthy spices. The taste made me even more curious to find out what I was eating. A quick search in Wikipedia revealed it to be “a sweet, dark-coloured, paste made of fruits and nuts eaten at the Passover Seder. Its colour and texture are meant to recall mortar (or mud used to make adobe bricks) which the Israelites used when they were enslaved in Ancient Egypt. The word “charoset” comes from the Hebrew word cheres “clay.”

A big thank you to CL for this lovely gift and amazing discovery that doubled as a good excuse to share my recipe for this humble but ever so versatile and tasty skillet bread.


Charoset

Charoset

Ingredients
(found on the blog ‘Natural Noshing’)
Serves 1-2

40g (1/3 cup) quinoa flour
40g (1/3 cup) buckwheat flour
80ml (1/3 cup) water
80ml (1/3 cup) unsweetened rice milk*
1 tsp lemon juice
1 egg
pinch of salt
1/2 tsp baking soda
optional: nigella seeds (DE: Schwarzkuemmel, NL: zwarte komijn)
oil
 

Recipe

  1. Combine the quinoa and buckwheat flour.
  2. Make a well in the center. Add in the water, milk, lemon juice and the egg. Use a fork or whisk to beat together the egg and the liquid and then the mix with the flour.
  3. Allow to stand for 5 min. While you heat a skillet (20 cm / 8 inch) over medium heat.
  4. Sift the baking powder into the batter.
  5. Grease the pan with a little oil.
  6. Pour in all the batter.
  7. Cook for 6-7 minutes.
  8. Flip and cook for another 5-6 minutes.
  9. Serve warm and cut into wedges.


Tips & Variations

  • instead of the rice milk you can of course use regular or other grain based milks
  • the original recipe also suggest replacing the milk and lemon juice with yoghurt, but I have not tested this
  • besides nigella seeds you can experiment with other spices or fresh herbs


Serve with

  • cheese and fresh grapes
  • butter and jam

221 IMG_6348


ผัดไทย

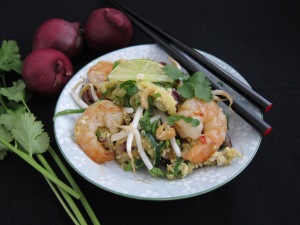
ผัดไทย (Pad Thai) – bringing authentic Thai street food to your table – with a twist.


“Tick, tick, tick”-  that sound was my first encounter with Pad Thai.

It was a few lifetimes ago, on one of my first holidays outside Europe. I had been in the country only a few hours and was waking up from a jet lagged coma in a tiny Bangkok hotel room.

At first I wasn’t sure whether the “tick, tick, tick” belonged to the world of my dreams or this exotic foreign land. I lifted a dream heavy hand to pull back the curtains (not too hard to do, as the room was only a few centimetres wider than the bed). The world outside had changed whilst I had been napping:  night had fallen and the day’s desolate street had tuned into a bright and buzzing stage.

There was a crowd in a circle on the street below.  At the heart of all, there was a little aluminium cart. Blue flames licking a wok. A man industriously working a stir-fry.

“Tick, tick, tick” and moments later I was holding a little square plastic tub. At first I was a little disappointed, that all this anticipation delivered no more than a few noodles, some bits of chicken and a few diced veg. But then I used my flimsy chopsticks to slide a bite into my mouth; an amazing flavour explosion hit me: sweet first, followed by spicy- salty and then the lightest touch of sour.

I experimented for a while with different recipes to get as close as I could to the memory of that taste. This time I combined the traditional flavours of Pad Thai with one of my newer discoveries: zucchini noodles. I was amazed how well they worked in this dish. If you do not feel inclined to take a julienne cutter – even better a spiral cutter – to a zucchini, this recipe works just as well with the customary rice noodles.

A plate of Pad Thai always takes me down memory lane for a few moments. But then it mainly makes me smile at all those new discoveries and adventures that lie ahead.

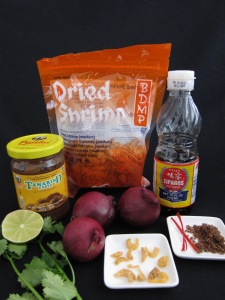
Tamarind, fish sauce and brown sugar are a must, but the shrimp are optional

Tamarind, fish sauce and brown sugar are a must, but the shrimp are optional


Ingredients
Serves 2

1-2 zucchini (or rice noodles)
150g raw prawns
2 tbsp lime juice
2 tbsp fish sauce
1 tbsp tamarind sauce
1 tsp brown sugar
pinch of dried chilli
optional: 2 level tbsp dried shrimp
spring onion
coriander
1/2 red onion or 1 shallot
2 garlic cloves
1 red chilli
black pepper
100g bean sprouts
2 eggs
peanuts
1 lime


Recipe

  1. If making zucchini noodles: Use a spiral- or julienne cutter to cut the zucchini into noodles. When using a spiral cutter, break the strands about three times as they are too hard to eat when they are too long.
  2. If using rice noodles: bring water to the boil and prepare the noodles according to packet instruction.
  3. Peel and devein the prawns.
  4. In a small pan combine the lime juice, fish sauce and tamarind sauce and brown sugar. Heat gently to dissolve the sugar and taste – add more of any of the ingredients as you wish. Season with dried chilli to taste. Set aside.
  5. If using dried shrimp: Pour some of the boiling water on the shrimp. Allow to sit 10 minutes.
  6. Thinly slice the spring onion.
  7. Chop the coriander.
  8. Slice onion into very thin half moon slices.
  9. Deseed and chop the chilli.
  10. Fry onion, chilli, garlic on a high heat until just soft.
  11. Drain the dried pawns and add, keeping the heat high.
  12. Add the noodles to the hot pan. Heat until the zucchini wilts (You are looking for the texture of al dente pasta.)
  13. Add the sauce.
  14. Push the noodles to the side. Add the prawns and black pepper. Cook until the prawns are just pink.
  15. Toss in the bean sprouts. Move all to the side again.
  16. Add the eggs. Pierce the yolks and, when they start to set on the bottom, scramble. Stir vigorously until almost set and then mix into the noodles.
  17. Add half spring onion and coriander (and peanuts).
  18. Arrange on a serving plate and sprinkle with remaining spring onion and coriander (and peanuts).
  19. Cut the lime in the wedges and serve on the side.

Serve with

  •  this is a dish of its own right, but you can add
  •  steamed bok choy
  •  Thai fish cakes


Variations
Replace the prawns with a combination of chicken and tofu

Some of the health benefits
Click on the links to discover some of the health benefits of bean sprouts or zucchini

Breakfast- (lunch-, high-tea-, snack-) muffins

Breakfast- (lunch-, high-tea-, snack-) muffins


This post is one big thank you to my dear friend MJ!

What for, you ask?

She was the one who got me blogging. She introduced me to the site “Tastespotting” – a real smörgåsbord of food blogs. And reading blogs inspired me to start my own.

Blogging made me discover that my passion for food is broader than just cooking. At some point I realized that I was really having fun styling food pictures and now I am learning that I might actually get pleasure from writing as well (“might” as sometimes stringing together words seems the hardest thing J ). Such a fabulous journey, so many hours spent doing something I enjoy.
….and she is the one who triggered this.

What is the occasion, you ask?

This week, for the first time, Tastespotting published a picture of mine. The result: 258 views in one day (and 200 the next). I was totally caught off guard. (Exactly as I was the first time somebody, who was not a friend, “liked” one of my posts.)

When I started this blog I had no clear goal in mind; one day I just found myself posting. The blog was about keeping a food dairy and about sharing my discoveries with friends; I never thought about any other visitors. By now I have made some lovely blogging friends and I have actually had responses from total strangers that have cooked recipes I shared (Can you imagine someone in Australia actually cooked my mum’s Ethiopian Lamb Stew?!).

What recipe could be good enough for the occasion, you ask?

How about one more thing that I am thankful for:  the recipe for those amazing muffins that MJ baked when I last visited her in Finland.

Just imagine: you are a house guest. You get to sleep in, but then the sweet scent of baking lures you out of bed and to the breakfast table where you are greeted with a tray full of fresh, golden muffins. And there you are, sitting at a kitchen table in sunny Finland digging into freshly baked muffins.

I’ve made these muffins several times since – gently sweet and brimming with goodness. They are just as fabulous with a quiet cup of afternoon tea as they are with a strong cup of morning coffee.

 IMG_4225

Ingredients
(slightly altered from ‘BBC Good Food‘)
12 muffins (around 180 kcal each)

1 ripe banana
2 large eggs
150ml low-fat yogurt (I use Total % Greek Yoghurt)
50ml canola oil (DE: Rapsoel, NL: Koolzaadolie ) alternatively you could use sunflower oil
100g apple sauce or puréed apples (I use my simple freezer apple sauce for this -about 1/2 apple)
4 tbsp honey
1 tsp vanilla extract
200g spelt flour (the original recipe uses wholemeal)
50g rolled oats, plus extra for sprinkling
2 tsp baking powder
1  tsp baking of soda (NL: zuiveringszout, dubbelkoolzure soda, natriumbicarbonaat, DE: Natron)
1½ tsp cinnamon
pinch of salt
100g (frozen) blueberries (or use raspberries as my friend MJ did)
2 tbsp mixed seeds (pumpkin, sunflower and flaxseed)


Recipe

  1. Heat oven to 175C.
  2. Line a 12-hole muffin tray with cup cake liners.
  3. In a bowl mush the banana with a fork.
  4. Heat oven to (180C) 160C fan/gas 4. Line a 12-hole muffin tray with 12 large muffin cases.
  5. Mush the banana with the fork.
  6. Whisk in the eggs.
  7. Then add the yoghurt, oil, apple sauce, honey and vanilla. Mix well.
  8. In a separate bowl combine the flour, oats, baking powder, baking soda, cinnamon and salt.
  9. Pour the wet ingredients into the dry and bring together quickly, but do not overwork.
  10. Fold in the (frozen) blueberries.
  11. Spoon the batter into the prepared muffin tin.
  12. Sprinkle with the extra oat flakes and seeds.
  13. Bake for 25-30min until they are golden and a skewer inserted into the centre comes out clean.
  14. Remove from the oven and allow to cool a little.
  15. They taste fabulous hot or cold (the next day)

IMG_4201

Thank you M, for amazing memories of Finland, friendship and food ;-)

Thank you M, for amazing memories of Finland, friendship and food 😉