Archive

Tag Archives: grains

Sunshine on a plate

Sunshine on a plate


Summer is here – well, officially it started yesterday, but the weather does not seem to be taking much heed. It has been grey, cool and wet.

It might not be a perfect warm day out there, but I still feel all summery. I am not sure if it is the sunflowers smiling over at me from the table or the sunny plate of food I just enjoyed; a light quinoa salad studded with red beans and golden mango.

I made this dish for the first time a few nights back as part of a little “end-of-the-work-week-feast”. At first I was not convinced the mango would be necessary. So I started by mixing all the other ingredients together: some cooked quinoa, a small can of beans, chopped spring onion and a crisp citrus mustard dressing. I was already quite happy with the result. But it was only when I decided to add the mango that this dish turned into something special. All the flavours pair beautifully, but I think the real magic is in the contrast between the sweet melting mango and the little pops of earthy quinoa. 

The first sunflower - bringing warmth and happiness symbolizing adoration and long levity

The first sunflower – bringing warmth and happiness symbolizing adoration and long levity


Ingredients
(hardly altered from the blog ‘Taste Love and Nourish‘)
Serves 4

Salad
200g of red kidney beans (about 1/2 can)
1 ripe mango
1 spring onion
about 1-1 1/2 cups of cooked quinoa
2 tbsp dried cranberries or currants

Vinaigrette
juice of 1/2 lemon
juice of 1 lime
2 tbsp olive oil
1/2  – 1 tsp Dijon mustard
1/2 tsp salt
1/4 tsp ground cumin

Topping
1 tbsp flat-leaf parsley
1 tbsp pumpkin seeds

238 IMG_9506

Recipe

  1. Rinse the beans well.
  2. Cut the mango into cubes.
  3. Slice the spring onion into thin rings.
  4. In a blow combine the quinoa with the beans, mango and spring onions.
  5. If using, cut the cranberries into smaller pieces (currants do not need to be cut). Add to the salad.
  6. In a small bowl combine all the dressing ingredients: lemon- and lime juice, oil, mustard, cumin, salt and pepper.
  7. Pour the dressing over the salad and carefully combine.
  8. If you have the time, keep in the fridge for 1 hour. Then allow to come to room temperature for 15 min. Salad is fine in the fridge for lunch or dinner the next day.
  9. Before serving. Chop the parsley and sprinkle over the salad together with the pumpkin seeds.

Tips & Variations

Consider some of the following

  • Use red instead of regular quinoa (used in the original recipe)
  • Use black beans instead of kidney beans (used in the original recipe)
  • Add frozen sweet corn kernels (used in the original recipe)
  • add avocado cubes or slices


Serve with

  • As part of a vegan dinner: spicy sweet potato, guacamole, green asparagus and strawberry salad with tortillas
  • Tandoori chicken drumsticks
  • Lambchops

More quinoa recipes


237 IMG_9416
When you spend a few days in a holiday home you only buy what is absolutely essentials for your stay, right?!

This is how – during our recent trip to France – I discovered that buckwheat and spelt flour are totally indispensable!  At least, this is what I deduct from the fact that they landed in the cart on our first shopping trip.

Or do I need to accept that I might be dealing with a touch of bread-baking obsession here? (Especially as my previous post is also about a holiday-bread experience)

No! Thankfully I can reverse-construct a good “reason”:  there was no bakery close to our little holiday house, which meant that having these flours saved us from the horrible fate of suffering stale bread.

Actually I need to correct myself on one point here:  I can hardly describe the place as “little”. It was a huge converted barn – a “little” dark and cold, but incredibly spacious with a fabulously equipped kitchen….and a huge oven that just had to be used.

237 IMG_9083
(Let’s hope nobody will notice I am side-stepped the flour-situation by inserting holiday pictures of our “little shed” and lovely Saint-Cirq-Lapopie).


237 IMG_9143 237 IMG_9167

But now about these scones:

  1. Quick and no fuss – they come together in no time at all. A little stir, roll, cut, and bake. No resting required.
    2. A note on the cheese – it makes the scones better but is not absolutely necessary: without the cheese they are still tasty, however the texture of both crumb and crust is a little more solid. They are certainly less golden and pretty. If you are watching your fat-intake you can leave out the cheese, but otherwise I would suggest using it.
    3. And then the secret trick – first you press the dough with your hands to half the thickness you would for a scone. After that you fold the dough double, press it lightly again before you cut out the scones. This creates a beautifully layered scone that breaks open easily. I am sure I will use this trick for other recipes as well.
    4. Substantial – these innocent looking biscuits will fill you up and keep your hunger at bay for a good while. For a full breakfast or lunch they are fabulous with scrambled eggs (with spinach and tomato, or filled with cottage cheese and chives, for example).

Ingredients
(from the blog ‘The Healthy Epicurean‘)
Serves 4 (12/16 or so scones)

150g spelt flour
100g buckwheat flour
3 tsp baking powder
1/2 tsp paprika
large pinch sea salt

1 tbsp chia seeds (optional)
100g strong cheese* (as I was in France I used aged Comté as suggested in the original recipe)
1 tbsp olive oil
125 ml milk
1 egg

237 IMG_9398

Recipe

  1. Preheat oven to 180C.
  2. In a large bowl sift together the two types of flour, baking powder, paprika and salt. Add chia if using.
  3. Grate the cheese. Using a metal spoon stir the cheese into the dry ingredients.
  4. In a separate bowl mix together the egg and milk. Then add the olive oil.
  5. Pour the wet ingredients into the dry ingredients. Using the metal spoon quickly stir together until a dough starts to form (add a little milk if the dough is too dry).
  6. Using your hands press the dough on a clean surface to about 5mm thick. (Do not use a rolling pin. It is too heavy and will stop the scones from rising.)
  7. Fold the dough back onto itself and gently flatten with the palm of your hand. (Folding it double will create that “break” in de the middle to cut the scone open.)
  8. Using a round cutter to cut scones (about 12-16 depending on the size of your cutter). You can gather the scraps and flatten them out again, be careful not to overwork the dough.
  9. Place on a baking tray and bake about 15 minutes until golden.
  10. Serve hot or cold.  

Tips & Variations

* You can omit the cheese; however the crumb as well as crust have a better texture with the cheese. On top of that the cheese makes the scones look wonderfully golden. But if you are watching your fat intake you can leave out the cheese and have a fabulously healthy scone.


Serve with

  • Scrambled eggs (with spinach and tomato, or filled with cottage cheese and chives, for example)
  • Brie and grapes

237 IMG_9363

Other bread recipes


Sometimes it surprises me how I can head into new situations with such naivety (or is it confidence? At times the two are so close together, I cannot tell)

I just returned from a road trip through Germany, Switzerland, Italy and France full of the most wonderful experiences; but the height of the trip was undoubtedly a two-day hike into the mountains of Italy’s Grand Pardiso – ten hours of scrambling upwards for 1500 meters and another day spent heading back down again.

230 IMG_7838

I love to walk, but my experience had been limited to a few hours rambling; usually carrying only a little camera or a bottle of water and a sandwich at the most. But, all of a sudden, here I was,  a little ruck-sack strapped to my back, heading off for a two-day trek into the mountains. I started walking, thinking little of how long it would take or how far I would have to go.

The first hour I was out of breath, my legs were aching and I could not imagine reaching the next turn in the path, let alone the nearest ridge. But somehow my body knew better than my mind; my breathing calmed down and each step was followed by another.

I did not count the times my mind offered the thought: ‘No, I cannot go any further’.’No, I cannot do this’. It was of little consequence, as there was always the ‘yes’ of the next step. For a while the resistance would be forgotten and my body moved on and continued walking.

We left behind our little town, the last few humans and then even the trees. The path became rougher; more and more often I was grateful for a hand to help me up to the next rock. We made our way through endless expanses of ever changing mountain side: rolling hills became jagged rock slides; shades of green were replaced by hues of grey.

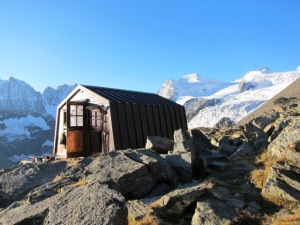
In the late afternoon our refuge for the night appeared in sight. My heart sank: I could make out no more than a small orange dot high up amongst dark rocks and white sky.

We continued walking

Ibex and chamois appeared. Carefree in their natural environment. A patch of snow. Constant  through the warm, long summer.

We continued walking

A little rain

We continued walking

And then, clambering over yet another rock, suddenly and finally the orange dot transformed into the little hut that was to be our shelter for the night. Four walls, a roof, some mattresses, blankets – that was all. No water. No electricity. Amongst those vast expanses of black rocks and white glaciers, this austere little hut seemed to me the most homely of places.

230 IMG_7818

Standing out there on the top of that mountain I felt so small and insignificant and yet so full of life.

Grand Paradiso

Grand Paradiso

Yesterday was my first day back at home – a day to be spent cocooning, savoring memories and enjoying doing nothing much at all.

Waking up late, I remembered that early morning before the hike into those rugged mountains: the charming small farm; the breakfast room warmed by a bread baking oven; the slices of fresh, home-made bread. I decided there could be no better start to my day of reminiscing than with a fresh loaf of bread. As the day was to be dedicated to laziness, a complicated recipe would not do. So, I pulled out my favourite quick bread recipe from my blogging friend Liz.

This bread requires no more than a quick sifting of the dry ingredients, some water and a brief stir. Then all you need to do is to exert a little patience, whilst the bread rises and bakes. 90 minutes from start to finish to create a beautiful fresh loaf. By the way, should you find yourself with leftovers, it also makes for a good slice of toast the next days.

I enjoyed mine with some Italian ham that had travelled with me from the previous day’s lunch. Munching on my homely slice of bread I thought back to the marvelous adventures of the last weeks.

230 IMG_8140

Ingredients
(from the blog ‘My Favourite Past Time‘)
1 loaf

oil or butter (I have a non-stick loaf tin for which I use oil. For a regular tin use butter)
450g whole wheat flour (NL: volkoren tarwemeel)
1 tsp salt
1 tsp instant yeast
1 tsp brown or muscovado (molasses) sugar
400ml warm water

Recipe

  1. Grease a 21 x 11 x 6cm (8½ x 4½ x 2½ inches) loaf tin with oil or butter and set aside in a warm place.
  2. Sift the flour, salt, yeast and sugar into a large bowl.
  3. Make a well in the centre and add the warm water.
  4. Stir from the outside to the middle for about a minute until a dough forms. It will be shaggy and sticky. It is enough to mix the dough until the flour is just incorporated.
  5. Spoon the dough into the prepared tin. Even it out a little.
  6. Cover the bread tin with oiled cling film (plastic wrap) and leave in a warm place for 30 min or until the dough has risen about 1cm (1/2 inch) from the top of the tin. (I like to keep the dough in the oven with a dish of boiling water.)
  7. Briefly before the rising time is finished preheat the oven to 200C (400C) (of course without the dough in it.)
  8. Bake the loaf for about 35-45 min or until a skewer comes out clean and the loaf sounds hollow when it is tapped on the base. (I usually bake 35 40 min, but have baked it as long as an hour).
  9. Turn the bread out onto a wire rack to cool slightly.

230 IMG_6495

Summer bliss in a glass

Summer bliss in a glass


Enjoying the most wonderful summer heat wave – much too nice to stay indoors and blog regularly…..or cook for that matter….

Usually my idea of a prefect weekends involves pancakes for breakfast, but with this weather I hardly want to stand over a hot stove, endlessly flipping pancakes. Thankfully this fabulously summery dish crossed my path: some fruits stewed with orange and then layered with honey sweetened yoghurt and roasted oats.

The magic in this dish is the contrast of flavours and textures: tart fruit topped with gently sweet smooth yoghurt and crunchy oats.

The original recipe involved a few more steps (and calories): some cream whipped stiff with golden sugar that is folded into the yoghurt and finally some cookies crumbled over the top of it all. But I kept it a little simpler – as this treat is all about enjoying the summer.

 226 IMG_7437 - Copy

Ingredients
(a little altered from Albert Heijn ‘Jools Schotse Zondag‘)
Serves 2


250g mixed frozen summer fruits (blueberries, strawberries, raspberries etc)
1 twig of fresh rosemary
2-3 tbsp honey
1/2 an orange
optional: 1-2 tbsp butter
100g oats
100g Greek Yoghurt 0% fat
Recipe

  1. Place frozen fruit, rosemary and 1/2 tbsp of the honey in a little pan.
  2. Grate in the orange peel and stir in juice.
  3. Bring to the boil. After a few minutes, when the fruit is soft and has released some juice, use a slotted spoon to remove the fruit and allow it to cool.
  4. Discard the rosemary and allow the sauce to cook a little longer and thicken. Add to the fruit.
  5. In a separate pan melt the butter (if using) and add oats and 1 tbsp of honey. Cook stirring regularly until the oats have turned golden.
  6. Stir the remaining tbsp of honey into the yoghurt.
  7. Layer the glasses with fruit, yoghurt, oats (repeat layers). Finish with a little fruit and/or oats.

Tips & Variations

  • Whip 50g cream with some golden sugar until stiff and fold into the yoghurt
  • Add some crumbled cookies to the layers


...and now off to have summer adventures...

…and now off to have summer adventures…


Quick and easy, fragrant bread

Quick and easy, fragrant bread


The other week I got a mysterious souvenir gift: a little jar labelled “Charoset”. I had to go by the picture of dates on the front to guess at its content as all the other words on the jar were in Hebrew. This little mystifying jar had travelled half-war round the world. Not only that, it had to travel most of the way all on its own: It started its trip comfortably nestled in the safety of the suitcase my friend CL was carrying on her way back from Israel. At the airport however security was suspicious of this little vessel with its dark content. So this little jar was packed off all on its own for the long trip to Europe. How foreign that little parcel must have looked on the baggage belt amongst all those huge and well travelled suitcases.

This weekend I was holding this little jar in my hands, impatient to discover its content. But after it had travelled all this way I could hardly just dive in with a spoon for an unceremonious quick taster. Bread was needed! But I had none, not even a single slice was to be found in the freezer. And I certainly did not have the patience to bake a loaf. So I pulled out my favourite recipe for super-fast, emergency skillet bread.

This bread comes together in minutes. It takes no more than a quick stir to make the batter and then a few minutes in a skillet on a stove. The combination of buckwheat and quinoa give this skillet bread a strong nutty flavour.  It is a great side for a cheese plate but just as nice with a spoon full of jam – or as it turns out, charoset. When I make it to go with something sweet I often throw in a teaspoon of nigella seeds to enhance the fragrant flavour of the bread. But this time I left it plain as I wanted the charoset to take the star role.

But I had no need to worry, the charoset was one powerful combination of flavours: deeply sweet with a hint of earthy spices. The taste made me even more curious to find out what I was eating. A quick search in Wikipedia revealed it to be “a sweet, dark-coloured, paste made of fruits and nuts eaten at the Passover Seder. Its colour and texture are meant to recall mortar (or mud used to make adobe bricks) which the Israelites used when they were enslaved in Ancient Egypt. The word “charoset” comes from the Hebrew word cheres “clay.”

A big thank you to CL for this lovely gift and amazing discovery that doubled as a good excuse to share my recipe for this humble but ever so versatile and tasty skillet bread.


Charoset

Charoset

Ingredients
(found on the blog ‘Natural Noshing’)
Serves 1-2

40g (1/3 cup) quinoa flour
40g (1/3 cup) buckwheat flour
80ml (1/3 cup) water
80ml (1/3 cup) unsweetened rice milk*
1 tsp lemon juice
1 egg
pinch of salt
1/2 tsp baking soda
optional: nigella seeds (DE: Schwarzkuemmel, NL: zwarte komijn)
oil
 

Recipe

  1. Combine the quinoa and buckwheat flour.
  2. Make a well in the center. Add in the water, milk, lemon juice and the egg. Use a fork or whisk to beat together the egg and the liquid and then the mix with the flour.
  3. Allow to stand for 5 min. While you heat a skillet (20 cm / 8 inch) over medium heat.
  4. Sift the baking powder into the batter.
  5. Grease the pan with a little oil.
  6. Pour in all the batter.
  7. Cook for 6-7 minutes.
  8. Flip and cook for another 5-6 minutes.
  9. Serve warm and cut into wedges.


Tips & Variations

  • instead of the rice milk you can of course use regular or other grain based milks
  • the original recipe also suggest replacing the milk and lemon juice with yoghurt, but I have not tested this
  • besides nigella seeds you can experiment with other spices or fresh herbs


Serve with

  • cheese and fresh grapes
  • butter and jam

221 IMG_6348