Archive

Tag Archives: bread

237 IMG_9416
When you spend a few days in a holiday home you only buy what is absolutely essentials for your stay, right?!

This is how – during our recent trip to France – I discovered that buckwheat and spelt flour are totally indispensable!  At least, this is what I deduct from the fact that they landed in the cart on our first shopping trip.

Or do I need to accept that I might be dealing with a touch of bread-baking obsession here? (Especially as my previous post is also about a holiday-bread experience)

No! Thankfully I can reverse-construct a good “reason”:  there was no bakery close to our little holiday house, which meant that having these flours saved us from the horrible fate of suffering stale bread.

Actually I need to correct myself on one point here:  I can hardly describe the place as “little”. It was a huge converted barn – a “little” dark and cold, but incredibly spacious with a fabulously equipped kitchen….and a huge oven that just had to be used.

237 IMG_9083
(Let’s hope nobody will notice I am side-stepped the flour-situation by inserting holiday pictures of our “little shed” and lovely Saint-Cirq-Lapopie).


237 IMG_9143 237 IMG_9167

But now about these scones:

  1. Quick and no fuss – they come together in no time at all. A little stir, roll, cut, and bake. No resting required.
    2. A note on the cheese – it makes the scones better but is not absolutely necessary: without the cheese they are still tasty, however the texture of both crumb and crust is a little more solid. They are certainly less golden and pretty. If you are watching your fat-intake you can leave out the cheese, but otherwise I would suggest using it.
    3. And then the secret trick – first you press the dough with your hands to half the thickness you would for a scone. After that you fold the dough double, press it lightly again before you cut out the scones. This creates a beautifully layered scone that breaks open easily. I am sure I will use this trick for other recipes as well.
    4. Substantial – these innocent looking biscuits will fill you up and keep your hunger at bay for a good while. For a full breakfast or lunch they are fabulous with scrambled eggs (with spinach and tomato, or filled with cottage cheese and chives, for example).

Ingredients
(from the blog ‘The Healthy Epicurean‘)
Serves 4 (12/16 or so scones)

150g spelt flour
100g buckwheat flour
3 tsp baking powder
1/2 tsp paprika
large pinch sea salt

1 tbsp chia seeds (optional)
100g strong cheese* (as I was in France I used aged Comté as suggested in the original recipe)
1 tbsp olive oil
125 ml milk
1 egg

237 IMG_9398

Recipe

  1. Preheat oven to 180C.
  2. In a large bowl sift together the two types of flour, baking powder, paprika and salt. Add chia if using.
  3. Grate the cheese. Using a metal spoon stir the cheese into the dry ingredients.
  4. In a separate bowl mix together the egg and milk. Then add the olive oil.
  5. Pour the wet ingredients into the dry ingredients. Using the metal spoon quickly stir together until a dough starts to form (add a little milk if the dough is too dry).
  6. Using your hands press the dough on a clean surface to about 5mm thick. (Do not use a rolling pin. It is too heavy and will stop the scones from rising.)
  7. Fold the dough back onto itself and gently flatten with the palm of your hand. (Folding it double will create that “break” in de the middle to cut the scone open.)
  8. Using a round cutter to cut scones (about 12-16 depending on the size of your cutter). You can gather the scraps and flatten them out again, be careful not to overwork the dough.
  9. Place on a baking tray and bake about 15 minutes until golden.
  10. Serve hot or cold.  

Tips & Variations

* You can omit the cheese; however the crumb as well as crust have a better texture with the cheese. On top of that the cheese makes the scones look wonderfully golden. But if you are watching your fat intake you can leave out the cheese and have a fabulously healthy scone.


Serve with

  • Scrambled eggs (with spinach and tomato, or filled with cottage cheese and chives, for example)
  • Brie and grapes

237 IMG_9363

Other bread recipes


Two weeks ago I came back from a great holiday in France with two fabulous “souvenirs”:

  1. The realization that I just don’t have the time to work as much as I did the last few months.
  2. This recipe for beautiful breakfast bread.

It is amazing how easily you can become so busy with “have to” that you too loose sight of “want to”.  A few busy days turn into busy weeks and suddenly the habit has established itself and you are just busy, busy, busy….busy.

But going on holiday broke that habit. Now that I am back, I suddenly feel I can take the time again to read, to cook or to do-nothing-in-particular. And I can tell you it feels so much better than doing only the things I feel I “have to”.

So, for no reason/occasion/purpose whatsoever, I made this bread this weekend.

But let me take a step back to tell you how I came about this recipe: during our holiday we spent a night in Burgundy. What I remember most about our little b&b, Les Clos d’Orret was the joint breakfast – the tasty local produce, the fun conversation and the beautiful breads. I emailed our hostess after our return and she was gracious enough to share her recipe with me. What I thought was a brioche, without the sugar, turns out to be a “Tresse au Beurre”- a  bread recipe she brought with her from Switzerland where it is traditionally eaten on Sunday morning

What an easy loaf to make: some mixing, kneading and resting and you end up with pretty bread that has chewy crust and a silky, tender crumb. Lovely topped with some jam or cream cheese and fresh fruit.

I thought it was best the day I baked it but still enjoyed it on the second. I am sure it would make a great toast as well (But I had gobbled it all up before thinking about trying – guess I will need to make another loaf soon).

Bon appétit!

Les Clos d'Orret or where I discovered "La Tresse au Beurre" and...

Les Clos d’Orret or where I discovered “La Tresse au Beurre” and…

...where I learned that, close to its source, the majestic Seine is a little river

…where I learned that, close to its source, the majestic Seine is a little river

Ingredients
1 loaf

300ml milk
1 tsp sugar
20g fresh yeast (or 10g instant dried yeast)*
500g all-purpose flour
50g butter, very soft at room temperature or melted
1 tsp salt
a little egg yolk


Recipe

  1. Slightly warm the milk.
  2. Add the sugar and yeast and allow to stand 5 min.
  3. Add the flour, soft butter and salt. Knead by hand for about 5 min into a soft, pliable dough.
  4. Place the dough in a bowl, cover and allow to rest in a warm place until it has doubled in size (I let it rise about 1 hour)
  5. Form the dough into the desired shape.
    I decided to make three tresses and braid them. I placed the bread in a loaf tin.
    I only searched on-line afterwards and got the impression that it is more traditional to make two tresses. You lay them to form a cross and then twist them together before placing the dough on a baking tray.
  6. Allow the bread to rise again. The instruction was “until it is big enough”, which I decided was after 45 min.
  7. Preheat oven to 220C.
  8. Brush or spray the bread with some egg yolk.
  9. Bake about 30 min or until it is golden and done. (Test by tapping the bottom with your knuckle to check the bread sounds hollow.)
  10. Transfer to a wire rack to allow to cool.

Tips & Variations
* Although you can make this bread using dried yeast it will taste better using fresh


Serve with

  • Jam
  • Cream cheese and fresh fruit

236 IMG_9431

All you have to do is stir together some ingredients and then let the oven do the work

All you have to do is stir together some ingredients and then let the oven do the work


Have you noticed that when you sit still time seems to rush by even faster than when you are occupied.
The last few days just raced past as I did nothing much more than sit on the couch with a box of kleenex. I caught a cold – not nasty enough to tie me to bed, but bad enough to keep me from going into the office. So the last few days were spent half lying on my couch,  doing a little work, browsing recipes and doing not very much else.
And somehow the hours just rushed by.

By the second day I had to do something to slow down time. Also I had run out of bread and felt starving (I always feel ravenous when I have a cold). Heading outside just did not seem an option (sniffle, cough). So I decided to find a bread recipe that required less effort than going to the shops.

I have a lovely recipe for a sturdy whole wheat bread that takes about 30 minutes to rise and 45 to bake. But even the wait for it to rise seemed like too much work. So I tried this super quick, super easy recipe. No kneading, no rising, no effort. Not much more than a sift and a stir and you are done.  A quick bake and the result is a fluffy bread with a lovely crunchy crust. The seeds give the bread some texture and a lovely flavour (do not leave them out).

And guess what: as I sipped my tea and bit into a fresh slice of bread with jam – the moment expanded and time slowed down.

Ingredients
(from the blog ‘Cinnamon and Thyme‘)
1 loaf (best eaten the same day)

260 g whole wheat spelt flour

2 full teaspoon baking powder (or cream of tartar)

1/2 tsp salt
1-2 tbsp sunflower seed + 1 tbps for sprinkling
1 tbsp flax seed (ground or whole)
1 tbsp hemp seed (I did not have any so added a little more flax)
250ml (mineral) water
2 tbsp olive oil
1 generous tbsp yoghurt (I used 0% Total Greek yoghurt. The original recipe states sour cream also works)

 Recipe

  1. Preheat oven to 190-200C.
  2. Sift flour, baking powder and salt into a bowl.
  3. Add the sunflower-, flax- and hemp seeds Stir.
  4. Add water and oil. Mix briefly with a spoon.
  5. Add yoghurt and quickly mix again. The dough will be quite sticky and wet.
  6. Cover a baking sheet with wax proof paper.
  7. Turn the dough out onto the paper and shape into an oval loaf.
  8. Sprinkle with remaining sun flower seeds.
  9. Place the loaf into the oven and bake about 40 (-50) min. Test with a skewer to ensure it is done.
  10. Wrap in a clean kitchen towel and allow to cool on a wire rack.
  11. This bread is best eaten the same day. Should you have some left over the next day you might want to toast it.

Sometimes it surprises me how I can head into new situations with such naivety (or is it confidence? At times the two are so close together, I cannot tell)

I just returned from a road trip through Germany, Switzerland, Italy and France full of the most wonderful experiences; but the height of the trip was undoubtedly a two-day hike into the mountains of Italy’s Grand Pardiso – ten hours of scrambling upwards for 1500 meters and another day spent heading back down again.

230 IMG_7838

I love to walk, but my experience had been limited to a few hours rambling; usually carrying only a little camera or a bottle of water and a sandwich at the most. But, all of a sudden, here I was,  a little ruck-sack strapped to my back, heading off for a two-day trek into the mountains. I started walking, thinking little of how long it would take or how far I would have to go.

The first hour I was out of breath, my legs were aching and I could not imagine reaching the next turn in the path, let alone the nearest ridge. But somehow my body knew better than my mind; my breathing calmed down and each step was followed by another.

I did not count the times my mind offered the thought: ‘No, I cannot go any further’.’No, I cannot do this’. It was of little consequence, as there was always the ‘yes’ of the next step. For a while the resistance would be forgotten and my body moved on and continued walking.

We left behind our little town, the last few humans and then even the trees. The path became rougher; more and more often I was grateful for a hand to help me up to the next rock. We made our way through endless expanses of ever changing mountain side: rolling hills became jagged rock slides; shades of green were replaced by hues of grey.

In the late afternoon our refuge for the night appeared in sight. My heart sank: I could make out no more than a small orange dot high up amongst dark rocks and white sky.

We continued walking

Ibex and chamois appeared. Carefree in their natural environment. A patch of snow. Constant  through the warm, long summer.

We continued walking

A little rain

We continued walking

And then, clambering over yet another rock, suddenly and finally the orange dot transformed into the little hut that was to be our shelter for the night. Four walls, a roof, some mattresses, blankets – that was all. No water. No electricity. Amongst those vast expanses of black rocks and white glaciers, this austere little hut seemed to me the most homely of places.

230 IMG_7818

Standing out there on the top of that mountain I felt so small and insignificant and yet so full of life.

Grand Paradiso

Grand Paradiso

Yesterday was my first day back at home – a day to be spent cocooning, savoring memories and enjoying doing nothing much at all.

Waking up late, I remembered that early morning before the hike into those rugged mountains: the charming small farm; the breakfast room warmed by a bread baking oven; the slices of fresh, home-made bread. I decided there could be no better start to my day of reminiscing than with a fresh loaf of bread. As the day was to be dedicated to laziness, a complicated recipe would not do. So, I pulled out my favourite quick bread recipe from my blogging friend Liz.

This bread requires no more than a quick sifting of the dry ingredients, some water and a brief stir. Then all you need to do is to exert a little patience, whilst the bread rises and bakes. 90 minutes from start to finish to create a beautiful fresh loaf. By the way, should you find yourself with leftovers, it also makes for a good slice of toast the next days.

I enjoyed mine with some Italian ham that had travelled with me from the previous day’s lunch. Munching on my homely slice of bread I thought back to the marvelous adventures of the last weeks.

230 IMG_8140

Ingredients
(from the blog ‘My Favourite Past Time‘)
1 loaf

oil or butter (I have a non-stick loaf tin for which I use oil. For a regular tin use butter)
450g whole wheat flour (NL: volkoren tarwemeel)
1 tsp salt
1 tsp instant yeast
1 tsp brown or muscovado (molasses) sugar
400ml warm water

Recipe

  1. Grease a 21 x 11 x 6cm (8½ x 4½ x 2½ inches) loaf tin with oil or butter and set aside in a warm place.
  2. Sift the flour, salt, yeast and sugar into a large bowl.
  3. Make a well in the centre and add the warm water.
  4. Stir from the outside to the middle for about a minute until a dough forms. It will be shaggy and sticky. It is enough to mix the dough until the flour is just incorporated.
  5. Spoon the dough into the prepared tin. Even it out a little.
  6. Cover the bread tin with oiled cling film (plastic wrap) and leave in a warm place for 30 min or until the dough has risen about 1cm (1/2 inch) from the top of the tin. (I like to keep the dough in the oven with a dish of boiling water.)
  7. Briefly before the rising time is finished preheat the oven to 200C (400C) (of course without the dough in it.)
  8. Bake the loaf for about 35-45 min or until a skewer comes out clean and the loaf sounds hollow when it is tapped on the base. (I usually bake 35 40 min, but have baked it as long as an hour).
  9. Turn the bread out onto a wire rack to cool slightly.

230 IMG_6495

Happy Easter!

Happy Easter!


The first days of spring always feel so tentative and so restrained: watery sunshine, pale buds. I wondered what I liked so much about this insipid season last year. And then spring burst out in its full extravagance. Suddenly there are almost endless hours of day-light (none of that hopeless saving of time). Everywhere you look there are vibrant greens bursting into life.

And then out of the blue there is Easter (was it not only just Christmas?)

As a kid Easter was spent hunting for eggs at my grandmother’s.  Usually we first coloured them with those brightartificialdyes that came in tablet form, but I will never forget the year that my uncle arrived with all these littlesachet of natural dyes….including dried red insects. (The seed for my fascination for unusual ingredients was planted at a young age 🙂 )

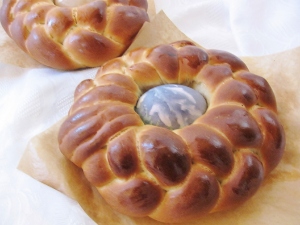
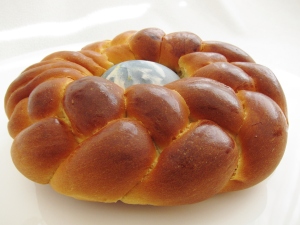
Besides painting eggs we do not really have any family Easter traditions…Except for eating together of course. This means that I am free to experiment with other people’s foody traditions 🙂  One wonderful discovery has been this beautiful braided sweet bread circled around a dyed egg.

The tradition of eating sweetened bread for Easter may date back as far as the Homeric Greek period (ca. 1100–800 BC). The eggs echo the significance of Easter as they are traditionally connected with rebirth, rejuvenation and immortality. Or, viewed from a more practical perspective: eggs were forbidden during Lent, after 40 days there would have been plenty of eggs that had to be used up.

This bread tastes wonderfully sweet and light; it looks stunning on any Easter brunch table.

NB: Nowadays I tend to opt for slightly less exotic ingredients for dying eggs. For some ideas pop over to my post on dying eggs with natural ingredients.

Wishing you a Happy Easter!


223 IMG_1568


Ingredients
(from the blog ‘Italian Dish‘)
4 breads


230ml (1,25 cups) milk
80g (1/3 cup) butter
1 package of instant yeast (about 3 tsp)
pinch of salt
80g (1/2 cup) sugar
2 eggs
350-500g (3,5 cups) flour
1 egg
6 dyed eggs (they can be dyed raw as they will bake in the oven)


Recipe

  1. In a small saucepan, warm the milk and butter until the butter just melts. Do not let the milk get too hot (or allow it too cool before adding it to the yeast).
  2. In a large bowl combine yeast, salt and sugar.
  3. Add the eggs and mix.
  4. Add the warm (not hot!) milk and butter mix.
  5. Add about half the flour and combine using the dough hooks of your mixer. Mix until smooth.
  6. Slowly add the remaining flour to form stiff dough. (The amount of flour needed will vary. You are looking for dough that is not sticky any more.)
  7. Knead the dough (either by hand or in a stand mixer) until the dough is pliable and soft.
  8. Lightly oil a bowl. Place the dough inside. Cover with cling film and allow to rise in a warm place until doubled – for about one hour.
  9. Prepare two baking trays by lining them with parchment paper.
  10. Punch down the dough. Divide into 12 pieces. Roll each piece into a rope (about 2.5cm / 1 inch thick and about 35cm/ 14 inch long).
  11. Taking three pieces at a time, braid them together. Loop into a circle, tucking the ends inside.
  12. Cover with cling film and allow to rise in a warm place until double – for about 30 minutes.
  13. Heat the oven to 175C (350F).
  14. Beat the remaining egg and brush over the bread.
  15. Place a dyed egg in the center of each bread, pushing it down slightly.
  16. Bake about 20 min until ht bread is golden brown.
  17. Allow to cool on a rack.
  18. Note: If you leave the bread out for a few hours you should no longer eat the eggs.

More Easter and egg recipes