Archive

Tag Archives: side dish

Sunshine on a plate

Sunshine on a plate


Summer is here – well, officially it started yesterday, but the weather does not seem to be taking much heed. It has been grey, cool and wet.

It might not be a perfect warm day out there, but I still feel all summery. I am not sure if it is the sunflowers smiling over at me from the table or the sunny plate of food I just enjoyed; a light quinoa salad studded with red beans and golden mango.

I made this dish for the first time a few nights back as part of a little “end-of-the-work-week-feast”. At first I was not convinced the mango would be necessary. So I started by mixing all the other ingredients together: some cooked quinoa, a small can of beans, chopped spring onion and a crisp citrus mustard dressing. I was already quite happy with the result. But it was only when I decided to add the mango that this dish turned into something special. All the flavours pair beautifully, but I think the real magic is in the contrast between the sweet melting mango and the little pops of earthy quinoa. 

The first sunflower - bringing warmth and happiness symbolizing adoration and long levity

The first sunflower – bringing warmth and happiness symbolizing adoration and long levity


Ingredients
(hardly altered from the blog ‘Taste Love and Nourish‘)
Serves 4

Salad
200g of red kidney beans (about 1/2 can)
1 ripe mango
1 spring onion
about 1-1 1/2 cups of cooked quinoa
2 tbsp dried cranberries or currants

Vinaigrette
juice of 1/2 lemon
juice of 1 lime
2 tbsp olive oil
1/2  – 1 tsp Dijon mustard
1/2 tsp salt
1/4 tsp ground cumin

Topping
1 tbsp flat-leaf parsley
1 tbsp pumpkin seeds

238 IMG_9506

Recipe

  1. Rinse the beans well.
  2. Cut the mango into cubes.
  3. Slice the spring onion into thin rings.
  4. In a blow combine the quinoa with the beans, mango and spring onions.
  5. If using, cut the cranberries into smaller pieces (currants do not need to be cut). Add to the salad.
  6. In a small bowl combine all the dressing ingredients: lemon- and lime juice, oil, mustard, cumin, salt and pepper.
  7. Pour the dressing over the salad and carefully combine.
  8. If you have the time, keep in the fridge for 1 hour. Then allow to come to room temperature for 15 min. Salad is fine in the fridge for lunch or dinner the next day.
  9. Before serving. Chop the parsley and sprinkle over the salad together with the pumpkin seeds.

Tips & Variations

Consider some of the following

  • Use red instead of regular quinoa (used in the original recipe)
  • Use black beans instead of kidney beans (used in the original recipe)
  • Add frozen sweet corn kernels (used in the original recipe)
  • add avocado cubes or slices


Serve with

  • As part of a vegan dinner: spicy sweet potato, guacamole, green asparagus and strawberry salad with tortillas
  • Tandoori chicken drumsticks
  • Lambchops

More quinoa recipes


Sometimes it surprises me how I can head into new situations with such naivety (or is it confidence? At times the two are so close together, I cannot tell)

I just returned from a road trip through Germany, Switzerland, Italy and France full of the most wonderful experiences; but the height of the trip was undoubtedly a two-day hike into the mountains of Italy’s Grand Pardiso – ten hours of scrambling upwards for 1500 meters and another day spent heading back down again.

230 IMG_7838

I love to walk, but my experience had been limited to a few hours rambling; usually carrying only a little camera or a bottle of water and a sandwich at the most. But, all of a sudden, here I was,  a little ruck-sack strapped to my back, heading off for a two-day trek into the mountains. I started walking, thinking little of how long it would take or how far I would have to go.

The first hour I was out of breath, my legs were aching and I could not imagine reaching the next turn in the path, let alone the nearest ridge. But somehow my body knew better than my mind; my breathing calmed down and each step was followed by another.

I did not count the times my mind offered the thought: ‘No, I cannot go any further’.’No, I cannot do this’. It was of little consequence, as there was always the ‘yes’ of the next step. For a while the resistance would be forgotten and my body moved on and continued walking.

We left behind our little town, the last few humans and then even the trees. The path became rougher; more and more often I was grateful for a hand to help me up to the next rock. We made our way through endless expanses of ever changing mountain side: rolling hills became jagged rock slides; shades of green were replaced by hues of grey.

In the late afternoon our refuge for the night appeared in sight. My heart sank: I could make out no more than a small orange dot high up amongst dark rocks and white sky.

We continued walking

Ibex and chamois appeared. Carefree in their natural environment. A patch of snow. Constant  through the warm, long summer.

We continued walking

A little rain

We continued walking

And then, clambering over yet another rock, suddenly and finally the orange dot transformed into the little hut that was to be our shelter for the night. Four walls, a roof, some mattresses, blankets – that was all. No water. No electricity. Amongst those vast expanses of black rocks and white glaciers, this austere little hut seemed to me the most homely of places.

230 IMG_7818

Standing out there on the top of that mountain I felt so small and insignificant and yet so full of life.

Grand Paradiso

Grand Paradiso

Yesterday was my first day back at home – a day to be spent cocooning, savoring memories and enjoying doing nothing much at all.

Waking up late, I remembered that early morning before the hike into those rugged mountains: the charming small farm; the breakfast room warmed by a bread baking oven; the slices of fresh, home-made bread. I decided there could be no better start to my day of reminiscing than with a fresh loaf of bread. As the day was to be dedicated to laziness, a complicated recipe would not do. So, I pulled out my favourite quick bread recipe from my blogging friend Liz.

This bread requires no more than a quick sifting of the dry ingredients, some water and a brief stir. Then all you need to do is to exert a little patience, whilst the bread rises and bakes. 90 minutes from start to finish to create a beautiful fresh loaf. By the way, should you find yourself with leftovers, it also makes for a good slice of toast the next days.

I enjoyed mine with some Italian ham that had travelled with me from the previous day’s lunch. Munching on my homely slice of bread I thought back to the marvelous adventures of the last weeks.

230 IMG_8140

Ingredients
(from the blog ‘My Favourite Past Time‘)
1 loaf

oil or butter (I have a non-stick loaf tin for which I use oil. For a regular tin use butter)
450g whole wheat flour (NL: volkoren tarwemeel)
1 tsp salt
1 tsp instant yeast
1 tsp brown or muscovado (molasses) sugar
400ml warm water

Recipe

  1. Grease a 21 x 11 x 6cm (8½ x 4½ x 2½ inches) loaf tin with oil or butter and set aside in a warm place.
  2. Sift the flour, salt, yeast and sugar into a large bowl.
  3. Make a well in the centre and add the warm water.
  4. Stir from the outside to the middle for about a minute until a dough forms. It will be shaggy and sticky. It is enough to mix the dough until the flour is just incorporated.
  5. Spoon the dough into the prepared tin. Even it out a little.
  6. Cover the bread tin with oiled cling film (plastic wrap) and leave in a warm place for 30 min or until the dough has risen about 1cm (1/2 inch) from the top of the tin. (I like to keep the dough in the oven with a dish of boiling water.)
  7. Briefly before the rising time is finished preheat the oven to 200C (400C) (of course without the dough in it.)
  8. Bake the loaf for about 35-45 min or until a skewer comes out clean and the loaf sounds hollow when it is tapped on the base. (I usually bake 35 40 min, but have baked it as long as an hour).
  9. Turn the bread out onto a wire rack to cool slightly.

230 IMG_6495


'Although I cannot lay an egg, I am a very good judge of omelettes' - George Bernard Shaw

‘Although I cannot lay an egg, I am a very good judge of omelettes’ – George Bernard Shaw

It is funny what can make you feel happy. I just found myself thinking: finally, finally it is cold, grey and rainy again – how fabulous that the weather is so dismal and I am so tired, that I want to stay inside, sit behind my laptop and finally write a post again. 🙂

The summer has been filled with long sunny days that were just too short for cooking extensive meals. Therefore the last weeks have been all about quick and easy dinners fixes. This dish has been one of my favourite discoveries: a simple silky omelette with plump and juicy prawns. The flavours are a combination of the saltiness of soy sauce and the delicate garlic of chives. It makes a lovely lunch dish or a light dinner with some fried rice and steamed paksoi.

I came across this Asian dish in the most roundabout way. It all started with a visit to Spain earlier this year and a day trip to Gibraltar. On a lunch menu full of rich and heavy dishes, the “Prawn Omelette” caught my eye.  The combination made so much sense. There I was looking forward to a delicate fluffy omelette, when my plate arrived piled high with these odd crispy fritters. Unfortunately they were greasy and lacked favour, but they had caught my imagination.

I discovered that Tortitas de Camarones, shrimp pancakes, are a specialty of Andalucía. They are made from an egg-less batter of (part) chickpea flour and of course shrimp.  Once home I almost became obsessed with turning, what sounded like a winning combination of ingredients, into a tasty dish. Obstinate as I am, I tried (and failed) over and over again. When I was mean with the oil the results was rubbery, almost slimy. When I gave in and cooked the fritters in generous amounts of oil, the texture was lovely, but the fritters were sickly greasy.

As I was about to make another experimental batch when my eye fell on the beautiful plump prawns I had bought (a variation on the tiny shrimp I had been using until then, in the hope it would improe things). And I realized I just didn’t have the heart to waste these beauties on another failed dish. So instead I decided to make the omelette that I would have wanted to have been served that day. Simple and plain but so satisfyingly delicate. 

The thing I like best about the island of Gibraltar …….is that it inspired me to make Asian Prawn Omelettes....and how it looks in the distance

The thing I like best about the island of Gibraltar …….is that it inspired me to make Asian Prawn Omelettes….and how it looks in the distance

Ingredients
(based on ‘Wokking Mum‘)
Serves 1

Marinated prawns
1 tsp shaoxing rice wine (or dry pale sherry or at a pinch some vermouth or sake, use a little less)
1/4 tsp tapioca- or corn starch
salt
pepper
6 large prawns

Omelette
1 small tomato
1 spring onion
optional: oil
1/2 tbsp tapioca- or corn starch
2 tbsp milk or chicken stock or water
1 tsp soy sauce
optional: a few drops of sesame oil
2 eggs
salt
pepper
chives
optional: oyster sauce


Recipe

  1. Combine the rice wine with the starch and mix until smooth.
  2. Add the salt, pepper and prawns. Refrigerate until ready to use. .
  3. Skin the tomatoes (bring a small pot of water to the boil. Cut a cross into the skin of the tomato. Briefly drop into the hot water. Remove and skin.)
  4. Dice the tomato. If it is very juicy you might want to discard the seeds.
  5. Chop the spring onion.
  6. If using, heat a little oil small pan. Fry the prawns until 80% cooked. Remove from the pan.
  7. Combine the starch with the milk, stock or water and mix until smooth.
  8. Whisk in the two eggs.
  9. Season with soy sauce, sesame oil (optional), salt and pepper.
  10. Add the tomato, spring onion and prawns to the egg mix.
  11. Pour the mixture back into the pan.
  12. Reduce the heat and cook until the egg is 90% set.
  13. Chop the chives.
  14. Plate and sprinkle with chives and oyster sauce, if using. 

Tips & Variations
After you have cooked the prawns add some thinly sliced onions and/or bean sprouts to your pan


Serve with
Fried rice and paksoi or sugar snaps

229 IMG_7511

Happy Easter!

Happy Easter!


The first days of spring always feel so tentative and so restrained: watery sunshine, pale buds. I wondered what I liked so much about this insipid season last year. And then spring burst out in its full extravagance. Suddenly there are almost endless hours of day-light (none of that hopeless saving of time). Everywhere you look there are vibrant greens bursting into life.

And then out of the blue there is Easter (was it not only just Christmas?)

As a kid Easter was spent hunting for eggs at my grandmother’s.  Usually we first coloured them with those brightartificialdyes that came in tablet form, but I will never forget the year that my uncle arrived with all these littlesachet of natural dyes….including dried red insects. (The seed for my fascination for unusual ingredients was planted at a young age 🙂 )

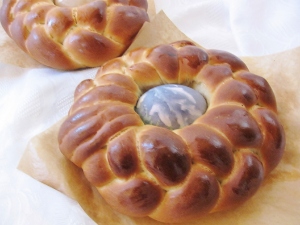
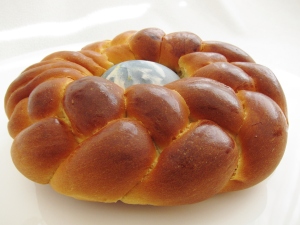
Besides painting eggs we do not really have any family Easter traditions…Except for eating together of course. This means that I am free to experiment with other people’s foody traditions 🙂  One wonderful discovery has been this beautiful braided sweet bread circled around a dyed egg.

The tradition of eating sweetened bread for Easter may date back as far as the Homeric Greek period (ca. 1100–800 BC). The eggs echo the significance of Easter as they are traditionally connected with rebirth, rejuvenation and immortality. Or, viewed from a more practical perspective: eggs were forbidden during Lent, after 40 days there would have been plenty of eggs that had to be used up.

This bread tastes wonderfully sweet and light; it looks stunning on any Easter brunch table.

NB: Nowadays I tend to opt for slightly less exotic ingredients for dying eggs. For some ideas pop over to my post on dying eggs with natural ingredients.

Wishing you a Happy Easter!


223 IMG_1568


Ingredients
(from the blog ‘Italian Dish‘)
4 breads


230ml (1,25 cups) milk
80g (1/3 cup) butter
1 package of instant yeast (about 3 tsp)
pinch of salt
80g (1/2 cup) sugar
2 eggs
350-500g (3,5 cups) flour
1 egg
6 dyed eggs (they can be dyed raw as they will bake in the oven)


Recipe

  1. In a small saucepan, warm the milk and butter until the butter just melts. Do not let the milk get too hot (or allow it too cool before adding it to the yeast).
  2. In a large bowl combine yeast, salt and sugar.
  3. Add the eggs and mix.
  4. Add the warm (not hot!) milk and butter mix.
  5. Add about half the flour and combine using the dough hooks of your mixer. Mix until smooth.
  6. Slowly add the remaining flour to form stiff dough. (The amount of flour needed will vary. You are looking for dough that is not sticky any more.)
  7. Knead the dough (either by hand or in a stand mixer) until the dough is pliable and soft.
  8. Lightly oil a bowl. Place the dough inside. Cover with cling film and allow to rise in a warm place until doubled – for about one hour.
  9. Prepare two baking trays by lining them with parchment paper.
  10. Punch down the dough. Divide into 12 pieces. Roll each piece into a rope (about 2.5cm / 1 inch thick and about 35cm/ 14 inch long).
  11. Taking three pieces at a time, braid them together. Loop into a circle, tucking the ends inside.
  12. Cover with cling film and allow to rise in a warm place until double – for about 30 minutes.
  13. Heat the oven to 175C (350F).
  14. Beat the remaining egg and brush over the bread.
  15. Place a dyed egg in the center of each bread, pushing it down slightly.
  16. Bake about 20 min until ht bread is golden brown.
  17. Allow to cool on a rack.
  18. Note: If you leave the bread out for a few hours you should no longer eat the eggs.

More Easter and egg recipes
222 001 (5)

I have mentioned before, that I started blogging because I wanted to keep a record of what I cook (just for myself) and wanted to find a way of sharing my recipe with friends and family (without bombarding them with endless emails). Little did I know that blogging would introduce me to a whole new world of blogging friends that share my passion for food. I have met so many lovely new people, like Vanya who I have really been enjoying to get to know through her stories,  recipes and the comments she leave on my posts.

And then one day Vanya took me by surprise by invting me for a visit – blogger style. A few weeks back she hosted me as a guest on her blog and I brought some Beet Muffins to celebrate the occasion. Of course I immidiately wanted to return the honour, by inviting her to do a guest post on my blog. She had a few suggestions for recipes of which one immidiately caught my eye: Arabian Fried Eggs. I was mystified and curious. But let me make way for Vanya to explain this magnificent recipe further:

222 001 (1)222 004


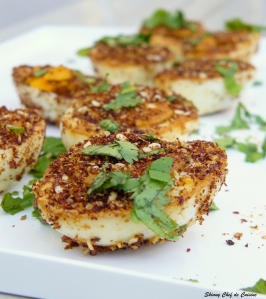
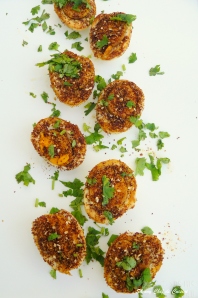
Fried hard boiled eggs are a common feature in many Middle Eastern households but you will find this most commonly in Egypt. I first came across this recipe in the Middle Eastern cookbook, Traditional Arabic Cooking by Miriam Al Hashimi. According to the author, if you take a walk through the markets of Cairo, you can find traders selling tiny packets or conesof blended spices which are used for flavouring the fried eggs.

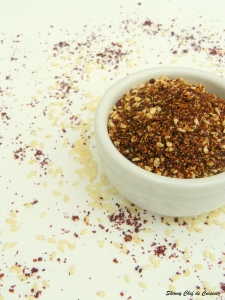
There are several different variations based on the blend of spices. The one I decided to try was the sumac-sesame seed blend.

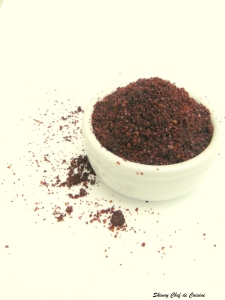
Sumac is a flowering shrub and the dried fruit drupes of this plant is ground to get a crimson red tangy spice that is used extensively in Middle Eastern cooking. This spice has a tangy, lemony, citrusy flavour that goes well in salad dressings and with grilled meats. Sumac is easily available these days at most supermarkets or in specialty Middle Eastern food stores.

This dish makes a delicious and pretty accompaniment or starter to any meal. So here’s the recipe for Baid Mutajjan or fried hard boiled eggs rolled in sumac-sesame seed spice blend.

222 001 (3)

Ingredients

5 fresh eggs
2-3 tbsp vegetable oil
3 tbsp sumac
2 tbsp sesame seeds
salt – to season
fresh coriander leaves – finely chopped, for garnish


Recipe

  1. Hard boil the eggs, remove shell and cut into halves. Season lightly with salt.
  2. Dry roast the sesame seeds till light golden; make sure not to burn.
  3. Coarsely grind the sumac and sesame seeds in a mortar and pestle and keep aside.
  4. In a flat pan, heat oil (on medium heat) and place the eggs yolk side down. A bit of splutter is expected. (You can fry the eggs whole too without cutting into halves but ensure that you prick a couple of holes with a fork to avoid the eggs from exploding.)
  5. After a minute or two, turn the eggs over and fry another minute. Remove from flame.
  6. Roll or dust the eggs with the sumac-sesame seed blend. Garnish with chopped coriander leaves just before serving.

 For more of Vanya’s amazing recipes visit her site Skinny Chef de Cuisine.


222 001 (4)