Sunshine on a plate

Sunshine on a plate


Summer is here – well, officially it started yesterday, but the weather does not seem to be taking much heed. It has been grey, cool and wet.

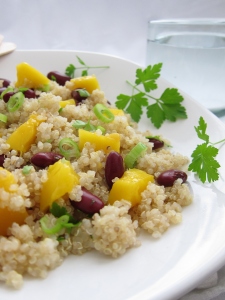
It might not be a perfect warm day out there, but I still feel all summery. I am not sure if it is the sunflowers smiling over at me from the table or the sunny plate of food I just enjoyed; a light quinoa salad studded with red beans and golden mango.

I made this dish for the first time a few nights back as part of a little “end-of-the-work-week-feast”. At first I was not convinced the mango would be necessary. So I started by mixing all the other ingredients together: some cooked quinoa, a small can of beans, chopped spring onion and a crisp citrus mustard dressing. I was already quite happy with the result. But it was only when I decided to add the mango that this dish turned into something special. All the flavours pair beautifully, but I think the real magic is in the contrast between the sweet melting mango and the little pops of earthy quinoa. 

The first sunflower - bringing warmth and happiness symbolizing adoration and long levity

The first sunflower – bringing warmth and happiness symbolizing adoration and long levity


Ingredients
(hardly altered from the blog ‘Taste Love and Nourish‘)
Serves 4

Salad
200g of red kidney beans (about 1/2 can)
1 ripe mango
1 spring onion
about 1-1 1/2 cups of cooked quinoa
2 tbsp dried cranberries or currants

Vinaigrette
juice of 1/2 lemon
juice of 1 lime
2 tbsp olive oil
1/2  – 1 tsp Dijon mustard
1/2 tsp salt
1/4 tsp ground cumin

Topping
1 tbsp flat-leaf parsley
1 tbsp pumpkin seeds

238 IMG_9506

Recipe

  1. Rinse the beans well.
  2. Cut the mango into cubes.
  3. Slice the spring onion into thin rings.
  4. In a blow combine the quinoa with the beans, mango and spring onions.
  5. If using, cut the cranberries into smaller pieces (currants do not need to be cut). Add to the salad.
  6. In a small bowl combine all the dressing ingredients: lemon- and lime juice, oil, mustard, cumin, salt and pepper.
  7. Pour the dressing over the salad and carefully combine.
  8. If you have the time, keep in the fridge for 1 hour. Then allow to come to room temperature for 15 min. Salad is fine in the fridge for lunch or dinner the next day.
  9. Before serving. Chop the parsley and sprinkle over the salad together with the pumpkin seeds.

Tips & Variations

Consider some of the following

  • Use red instead of regular quinoa (used in the original recipe)
  • Use black beans instead of kidney beans (used in the original recipe)
  • Add frozen sweet corn kernels (used in the original recipe)
  • add avocado cubes or slices


Serve with

  • As part of a vegan dinner: spicy sweet potato, guacamole, green asparagus and strawberry salad with tortillas
  • Tandoori chicken drumsticks
  • Lambchops

More quinoa recipes


237 IMG_9416
When you spend a few days in a holiday home you only buy what is absolutely essentials for your stay, right?!

This is how – during our recent trip to France – I discovered that buckwheat and spelt flour are totally indispensable!  At least, this is what I deduct from the fact that they landed in the cart on our first shopping trip.

Or do I need to accept that I might be dealing with a touch of bread-baking obsession here? (Especially as my previous post is also about a holiday-bread experience)

No! Thankfully I can reverse-construct a good “reason”:  there was no bakery close to our little holiday house, which meant that having these flours saved us from the horrible fate of suffering stale bread.

Actually I need to correct myself on one point here:  I can hardly describe the place as “little”. It was a huge converted barn – a “little” dark and cold, but incredibly spacious with a fabulously equipped kitchen….and a huge oven that just had to be used.

237 IMG_9083
(Let’s hope nobody will notice I am side-stepped the flour-situation by inserting holiday pictures of our “little shed” and lovely Saint-Cirq-Lapopie).


237 IMG_9143 237 IMG_9167

But now about these scones:

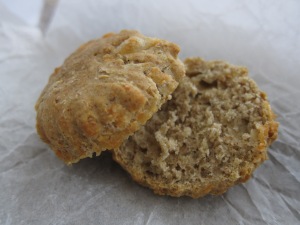
  1. Quick and no fuss – they come together in no time at all. A little stir, roll, cut, and bake. No resting required.
    2. A note on the cheese – it makes the scones better but is not absolutely necessary: without the cheese they are still tasty, however the texture of both crumb and crust is a little more solid. They are certainly less golden and pretty. If you are watching your fat-intake you can leave out the cheese, but otherwise I would suggest using it.
    3. And then the secret trick – first you press the dough with your hands to half the thickness you would for a scone. After that you fold the dough double, press it lightly again before you cut out the scones. This creates a beautifully layered scone that breaks open easily. I am sure I will use this trick for other recipes as well.
    4. Substantial – these innocent looking biscuits will fill you up and keep your hunger at bay for a good while. For a full breakfast or lunch they are fabulous with scrambled eggs (with spinach and tomato, or filled with cottage cheese and chives, for example).

Ingredients
(from the blog ‘The Healthy Epicurean‘)
Serves 4 (12/16 or so scones)

150g spelt flour
100g buckwheat flour
3 tsp baking powder
1/2 tsp paprika
large pinch sea salt

1 tbsp chia seeds (optional)
100g strong cheese* (as I was in France I used aged Comté as suggested in the original recipe)
1 tbsp olive oil
125 ml milk
1 egg

237 IMG_9398

Recipe

  1. Preheat oven to 180C.
  2. In a large bowl sift together the two types of flour, baking powder, paprika and salt. Add chia if using.
  3. Grate the cheese. Using a metal spoon stir the cheese into the dry ingredients.
  4. In a separate bowl mix together the egg and milk. Then add the olive oil.
  5. Pour the wet ingredients into the dry ingredients. Using the metal spoon quickly stir together until a dough starts to form (add a little milk if the dough is too dry).
  6. Using your hands press the dough on a clean surface to about 5mm thick. (Do not use a rolling pin. It is too heavy and will stop the scones from rising.)
  7. Fold the dough back onto itself and gently flatten with the palm of your hand. (Folding it double will create that “break” in de the middle to cut the scone open.)
  8. Using a round cutter to cut scones (about 12-16 depending on the size of your cutter). You can gather the scraps and flatten them out again, be careful not to overwork the dough.
  9. Place on a baking tray and bake about 15 minutes until golden.
  10. Serve hot or cold.  

Tips & Variations

* You can omit the cheese; however the crumb as well as crust have a better texture with the cheese. On top of that the cheese makes the scones look wonderfully golden. But if you are watching your fat intake you can leave out the cheese and have a fabulously healthy scone.


Serve with

  • Scrambled eggs (with spinach and tomato, or filled with cottage cheese and chives, for example)
  • Brie and grapes

237 IMG_9363

Other bread recipes



Two weeks ago I came back from a great holiday in France with two fabulous “souvenirs”:

  1. The realization that I just don’t have the time to work as much as I did the last few months.
  2. This recipe for beautiful breakfast bread.

It is amazing how easily you can become so busy with “have to” that you too loose sight of “want to”.  A few busy days turn into busy weeks and suddenly the habit has established itself and you are just busy, busy, busy….busy.

But going on holiday broke that habit. Now that I am back, I suddenly feel I can take the time again to read, to cook or to do-nothing-in-particular. And I can tell you it feels so much better than doing only the things I feel I “have to”.

So, for no reason/occasion/purpose whatsoever, I made this bread this weekend.

But let me take a step back to tell you how I came about this recipe: during our holiday we spent a night in Burgundy. What I remember most about our little b&b, Les Clos d’Orret was the joint breakfast – the tasty local produce, the fun conversation and the beautiful breads. I emailed our hostess after our return and she was gracious enough to share her recipe with me. What I thought was a brioche, without the sugar, turns out to be a “Tresse au Beurre”- a  bread recipe she brought with her from Switzerland where it is traditionally eaten on Sunday morning

What an easy loaf to make: some mixing, kneading and resting and you end up with pretty bread that has chewy crust and a silky, tender crumb. Lovely topped with some jam or cream cheese and fresh fruit.

I thought it was best the day I baked it but still enjoyed it on the second. I am sure it would make a great toast as well (But I had gobbled it all up before thinking about trying – guess I will need to make another loaf soon).

Bon appétit!

Les Clos d'Orret or where I discovered "La Tresse au Beurre" and...

Les Clos d’Orret or where I discovered “La Tresse au Beurre” and…

...where I learned that, close to its source, the majestic Seine is a little river

…where I learned that, close to its source, the majestic Seine is a little river

Ingredients
1 loaf

300ml milk
1 tsp sugar
20g fresh yeast (or 10g instant dried yeast)*
500g all-purpose flour
50g butter, very soft at room temperature or melted
1 tsp salt
a little egg yolk


Recipe

  1. Slightly warm the milk.
  2. Add the sugar and yeast and allow to stand 5 min.
  3. Add the flour, soft butter and salt. Knead by hand for about 5 min into a soft, pliable dough.
  4. Place the dough in a bowl, cover and allow to rest in a warm place until it has doubled in size (I let it rise about 1 hour)
  5. Form the dough into the desired shape.
    I decided to make three tresses and braid them. I placed the bread in a loaf tin.
    I only searched on-line afterwards and got the impression that it is more traditional to make two tresses. You lay them to form a cross and then twist them together before placing the dough on a baking tray.
  6. Allow the bread to rise again. The instruction was “until it is big enough”, which I decided was after 45 min.
  7. Preheat oven to 220C.
  8. Brush or spray the bread with some egg yolk.
  9. Bake about 30 min or until it is golden and done. (Test by tapping the bottom with your knuckle to check the bread sounds hollow.)
  10. Transfer to a wire rack to allow to cool.

Tips & Variations
* Although you can make this bread using dried yeast it will taste better using fresh


Serve with

  • Jam
  • Cream cheese and fresh fruit

236 IMG_9431


Juicy, tasty morsels with a little spice

Juicy, tasty morsels with a little spice

Finally I have dug myself out from under the pile of work that filled my last few months. Finally, finally I have a little time and energy to post a recipe again – I have been missing it!

So to celebrate the occasion I threw myself a tiny little party. All very private and exclusive: just me and a plate of nibbles.

I got off from work much too late to buy fresh ingredients. But my mad working hours have made me rather good at stocking up the freezer. So I grabbed some frozen fish and prawns and within no time I had these lovely fish cakes sizzling in the oven. (Actually I even grabbed the coconut milk from the freezer – whenever I have some left-over I freeze the rest in an ice-cube tray and then pop the cubes into a freezer bag).

The amazing thing is this really is a store-cupboard/freezer dish – you need nothing fresh (I do admit I would suggest adding the fresh coriander, but I have done it without plenty of times).

I’ll be honest these are not quite authentic Thai fish cakes, but they are so tasty and healthy so I have stuck with these. ( I love them as a starter or side to zucchini “Pad Thai”)

By the way, you can play with the texture of these by adjusting the baking time. Baking them longer makes them a little chewy and more like the fish cakes I have eaten in Thailand. If you cook them for a shorter time they are more succulent and airier.  Either way, they are fabulous.

The only thing I have to admit…..this recipe is not coming to you very ‘fresh’. It has been over a week month since I threw myself that I-finally-have-time-to-blog-again party. I guess I still need to do some work on the recipe for the perfect free – and work time balance.

 235 IMG_5958

Ingredients
(a hardly altered from the blog ‘45 Degrees‘)
Serves 2

350 g  white-fleshed fish fillets( frozen is fine) (I have used cod, red mullet)
150 g uncooked, peeled prawns (frozen is fine)
2 tbsp ( low-fat)  coconut milk
1 tbsp fish sauce
1/2 tbsp chili powder
1/3 tsp ground cumin
1/4 tsp ground coriander
1/2 tsp brown sugar
optional: 1 kaffir lime leaves (I find mine in the freezer section of my Asian supermarket)
1 spring onions
small handful fresh coriander
2cm piece ginger,
3 cloves garlic
1 red chili (alternatively 1/2 tsp dried crushed chili)


Recipe

  1. Rinse the fish and prawns and pat as dry as possible.
  2. Cut in chunks and place in food processor.
  3. In a cup combine coconut milk, fish sauce, chili powder, cumin, coriander and brown sugar. Pour over the fish.
  4. Use scissors to cut the lime leaf into strips.
  5. Slice spring onion.
  6. Chop coriander.
  7. Grate the ginger.
  8. Mince the garlic
  9. Chop the chili.
  10. Add all the above ingredients to the fish.
  11. Pulse to create a thick paste.
  12. Use your hands to form the paste into little balls (about the size of a golf ball). Press to make a thick disk. (Tip: wet your hands to make the rolling easier. If your paste is too wet you can add a little flour or breadcrumbs.)
  13. Refrigerate the cakes for 10 min (you can scip this step but I find it makes for juicier cakes).
  14. Preheat the oven to 190C.
  15. Line a baking tray with greaseproof paper. Place cakes on tray.
  16. Bake 15 min. Turn and bake another 10-15 min. The cakes will still be quite moist. If you prefer a chewier cake bake for a little longer).
  17. Serve with a dipping sauce or Sweet chili sauce, a lime wedge and a few coriander leaves.

Serve with

  • Plain as a starter
  • As a side to zucchini Pad Thai


Tips

  • All the ingredients can be stored in the freezer (and the coriander can be left out.)
  • Left-over coconut milk can be frozen in an ice cube tray and then stored in a freezer bag.

Related recipes

All you have to do is stir together some ingredients and then let the oven do the work

All you have to do is stir together some ingredients and then let the oven do the work


Have you noticed that when you sit still time seems to rush by even faster than when you are occupied.
The last few days just raced past as I did nothing much more than sit on the couch with a box of kleenex. I caught a cold – not nasty enough to tie me to bed, but bad enough to keep me from going into the office. So the last few days were spent half lying on my couch,  doing a little work, browsing recipes and doing not very much else.
And somehow the hours just rushed by.

By the second day I had to do something to slow down time. Also I had run out of bread and felt starving (I always feel ravenous when I have a cold). Heading outside just did not seem an option (sniffle, cough). So I decided to find a bread recipe that required less effort than going to the shops.

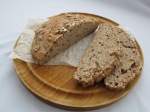
I have a lovely recipe for a sturdy whole wheat bread that takes about 30 minutes to rise and 45 to bake. But even the wait for it to rise seemed like too much work. So I tried this super quick, super easy recipe. No kneading, no rising, no effort. Not much more than a sift and a stir and you are done.  A quick bake and the result is a fluffy bread with a lovely crunchy crust. The seeds give the bread some texture and a lovely flavour (do not leave them out).
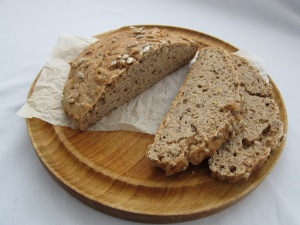
And guess what: as I sipped my tea and bit into a fresh slice of bread with jam – the moment expanded and time slowed down.

Ingredients
(from the blog ‘Cinnamon and Thyme‘)
1 loaf (best eaten the same day)

260 g whole wheat spelt flour

2 full teaspoon baking powder (or cream of tartar)

1/2 tsp salt
1-2 tbsp sunflower seed + 1 tbps for sprinkling
1 tbsp flax seed (ground or whole)
1 tbsp hemp seed (I did not have any so added a little more flax)
250ml (mineral) water
2 tbsp olive oil
1 generous tbsp yoghurt (I used 0% Total Greek yoghurt. The original recipe states sour cream also works)

 Recipe

  1. Preheat oven to 190-200C.
  2. Sift flour, baking powder and salt into a bowl.
  3. Add the sunflower-, flax- and hemp seeds Stir.
  4. Add water and oil. Mix briefly with a spoon.
  5. Add yoghurt and quickly mix again. The dough will be quite sticky and wet.
  6. Cover a baking sheet with wax proof paper.
  7. Turn the dough out onto the paper and shape into an oval loaf.
  8. Sprinkle with remaining sun flower seeds.
  9. Place the loaf into the oven and bake about 40 (-50) min. Test with a skewer to ensure it is done.
  10. Wrap in a clean kitchen towel and allow to cool on a wire rack.
  11. This bread is best eaten the same day. Should you have some left over the next day you might want to toast it.